Windows 11 Pro Start menu and search not working fix Win 11 Pro Start menu and search icon not working. Win 11 Pro Start menu and search icon not working. Start Menu Icon and Search Icon on the taskbar not working.
We understand that you’ve reported that the Start menu and Search icon on the taskbar are not working on your Windows 11 Pro device.
This is often caused by temporary system errors, corrupt user profile settings, or outdated system files. We recommend the following steps to resolve the issue:
- Windows 11 pro start menu and search not working fix reddit
- Windows Start button and search not working Windows 11
- Windows 11 search not working registry fix
- Windows 11 search bar not working
- Windows Start button and search not working Windows 10
- Windows 11 search bar not working after update
- Windows 11 search bar not working Reddit
- Windows 11 search bar keeps loading
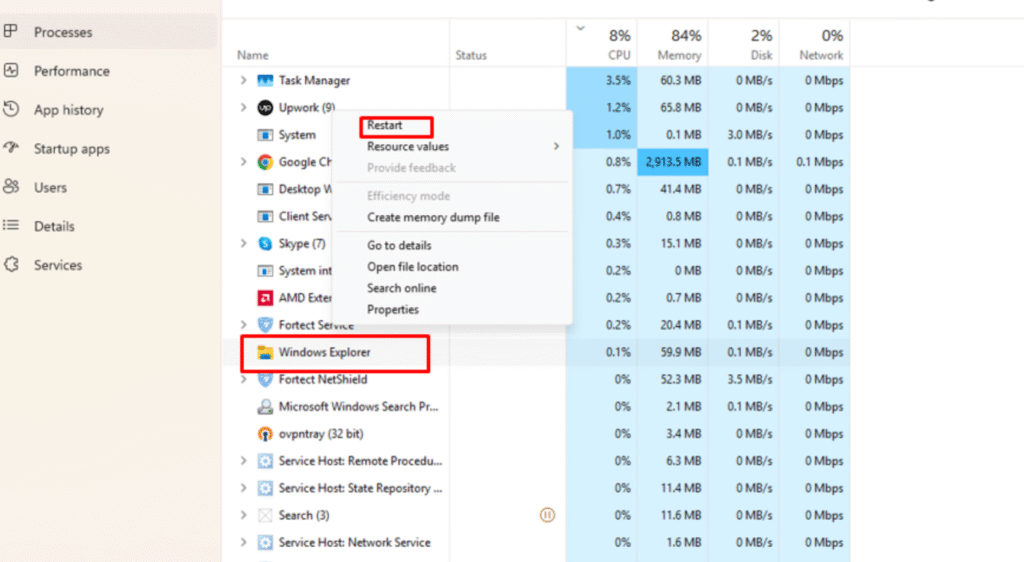
- Restart Windows Explorer: Open Task Manager, select the “Windows Explorer” process, and click “Restart.”
- Repair system files: In an Administrator Command Prompt, run sfc /scannow, then DISM /Online /Cleanup-Image /RestoreHealth.
- Check Windows Update: Install the latest updates to ensure any known bugs are fixed.
- Create a new user profile: Test to see if the issue is specific to the current user.
If the issue persists after these steps, please provide us with screenshots of the error message and your device’s Windows version information so we can provide more detailed support.
Windows 11 Pro Start menu and search not working fix

Troubleshooting Windows 11 Pro Start Menu and Search Not Working
This is a common issue in Windows 11, often caused by corrupted system files, indexing glitches, outdated updates, or temporary process hangs. Since the Start menu and search are tied together, fixes for one usually resolve both. Start with the simplest steps below and work your way down. These are safe for Windows 11 Pro users and don’t require third-party tools.

Short tutorial: How to Fix Start Menu Not Working in Windows 11
- Press Ctrl + Shift + Esc to open Task Manager.
- Find Windows Explorer under the Processes tab.
- Right-click it and select Restart.
- Check if the Start Menu is now working.
I saw that you found a solution by changing the Windows registry, but just in case, I’ll add a few more options here for anyone else who runs into a similar problem and can’t find a fix:
- From Task Manager, stop the processes SearchHost.exe and/or SearchUI.exe – they will restart automatically, and sometimes this resolves search issues.
- Reinitialize the Search package via PowerShell: Get-AppxPackage -allusers Microsoft.Windows.Search | Reset-AppxPackage
- Try the instructions from this guide.
- If none of this works and you think you might waste too much time fixing Windows Search, you may consider using a third-party search tool.
1. Restart Windows Explorer (Quickest First Fix)
This refreshes the taskbar, Start menu, and search without a full reboot.

- Press Ctrl + Shift + Esc to open Task Manager.
- In the Processes tab, scroll to find Windows Explorer.
- Right-click it and select Restart.
- Test the Start button (Win key) and search icon.
If it doesn’t stick, proceed to the next step.
2. Run the Built-in Search Troubleshooter
Windows has a dedicated tool for this.
- Press Win + I (if Settings opens) or use Win + R, type ms-settings:troubleshoot, and hit Enter.
- Go to Other troubleshooters (or Additional troubleshooters in older builds).
- Find Search and Indexing, click Run, and follow the prompts.
- Restart your PC and test.
3. Check for Windows Updates
Bugs like this are often fixed in patches (e.g., recent 24H2 updates addressed search typing issues).
- Use Win + R, type ms-settings:windowsupdate, and hit Enter.
- Click Check for updates and install any available ones.
- Restart after updating.
4. Restart Search-Related Processes
Kill and restart the core search and Start components.
- Open Task Manager (Ctrl + Shift + Esc).
- In Processes, find SearchHost.exe or SearchUI.exe (for older builds), right-click, and select End task.
- Then find StartMenuExperienceHost.exe, right-click, and End task.
- Close Task Manager—the processes should auto-restart. Test search.
5. Rebuild Search Index
Corrupted indexing often breaks Start menu searches.
- Use Win + R, type control.exe srchadmin.dll, and hit Enter (opens Indexing Options).
- Click Advanced > Rebuild under Troubleshooting.
- Confirm and let it run (may take 10–30 minutes). Restart afterward.
6. Run System File Checker (SFC) and DISM Scans
Repairs corrupted system files that could affect the UI.
- Right-click Start (or press Win + X) > Windows Terminal (Admin) or Command Prompt (Admin).
Code: DISM /Online /Cleanup-Image /RestoreHealth
Code: sfc /scannow
- Restart and test. This can take 15–20 minutes.
7. Re-register Start Menu and Search Components (PowerShell Fix)
Resets the underlying apps without reinstalling Windows.
- Right-click Start > Windows Terminal (Admin).

- Run this command;
Get-AppXPackage -AllUsers | Foreach {Add-AppxPackage -DisableDevelopmentMode -Register “$($_.InstallLocation)\AppXManifest.xml”}
- For search specifically, also run:
Get-AppxPackage Microsoft.Windows.Search* | Reset-AppxPackage
- Restart your PC.
8. Create a New User Profile (If Profile-Specific)
Test if it’s your user account that’s corrupted.
- Use Win + R, type netplwiz, hit Enter.
- Click Add > Follow prompts to create a local admin account.
- Log out and sign into the new account. If Start/search works, migrate your files/settings to it (copy from C:\Users\OldUsername).
9. Reset Windows Search via PowerShell (Advanced)
- If on 24H2 or later, use Microsoft’s reset script.
In admin PowerShell, run:
Get-AppxPackage MicrosoftWindows.Client.Search* | Reset-AppxPackage
Or download/run the official reset script from Microsoft (search “Windows Search reset PowerShell” in your browser if needed).
Additional Tips
- Update Graphics Drivers: Outdated GPU drivers can glitch the UI. In Device Manager (Win + X > Device Manager), expand Display adapters, right-click your card > Update driver > Search automatically.
- Disable Bing Integration (If Search is Slow/Blank): In Registry Editor (Win + R > regedit), go to
- HKEY_CURRENT_USER\Software\Policies\Microsoft\Windows\Explorer, add DWORD DisableSearchBoxSuggestions = 1. Restart Explorer.
- If Nothing Works: Use Win + R > ms-settings:recovery > Reset this PC (keep files). As a last resort, boot to Safe Mode (hold Shift during restart) and test.

Most users resolve this with steps 1–3. If the issue started after a specific update or app install, mention details for more tailored advice. Back up important files first!
hello and welcome back to my another tutorial in this tutorial i am going to share with you how to fix windows 11 start menu not working also windows 11 search bar is not working so let’s take a look how to do that maybe somehow or some cases in windows 11 start menu and search bar is not working in this video i am going to share it to different couple of ways how you can fix that first of all i will suggest you to restart windows explorer in order to do that you need to click in your keyboard control alt delete whenever you click ctrl alt delete even you see your lock screen is going to be looks like this you need to click here tax manager so actually in my system my sas bar and tax manager this start menu is working but uh i will jump over the tax manager so i’m just right click over on it and then i’m going to click here tax manager so after open the tax manager whenever you press ctrl delete and use go from jump over from lock screen to tax manager and it’s going to be looks like this so here you need to click this more details and it’s going to be uh looks like this is go all the way down and try to find out windows explorer after choose this windows explorer you need to click here restart and after that see easy windows 11 start menu and search bar is working or not if it is not working let me share with you the second step same things you need to click in your keyboard ctrl alt delete and then whenever you click ctrl alt delete it’s going to be looks like this you need to click choose the tax manager so when you click tax manager it’s going to be looks like this from here you need to click these services after click over side with this says you need to find out w search so this is the uh w search this is the you can see i’m just trying to find out w search so this is the w search so right click over on it and click here open services after click over open services it’s going to be looks like this you need to scroll all the way down and then you need to find here again windows search so this is the windows search double click over on it and then you’re going to see it’s going to be looks like this you’re going to choose a startup type automatic and faster for them to click a stop and it’s going to be stopped and again click here start and click here apply and click here ok and after that restart your pc and after restart your pc and then try to open your windows 11 start menu and search bar hopefully it’s going to be work in this step we’re going to disable recommended and recent open apps sometime if you turn on this recommended and recent open apps it’s make delay to open a start menu and search bar for example if i jump or start menu you’re going to see this is the uh recommended apps and uh also it’s going to be appear as however it’s up here the recent apps so we’re going to disable this thing so in order to do that you need to go into windows 11 start menu and then click here setting after click over setting you see skin appear just like this even to click here personalization after click over personalization you need to click here start and then you see something says show recent added apps i’m going to turn this off also something says show recent open items in instagram list and file explorer we’re going to turn this off hopefully within this step also it’s going to fix your windows 11 start menu and search file if it is not working let me share you to the third step in this step we’re going to open our control panel and then we’re going to see our control panel going to be looks like this we’re going to click here troubleshooting after click over troubleshooting we’re going to click here bul and we’re going to see it’s going to be looks like this we’re going to click a search indexing after click our starts and index is going to click here next and then even you see there is a a lot of option appear first of all we’re going to choose this can start a search or see result we’re going to choose that and then we’re going to click here next and it’s going to be uh fixing if there is any issue with our search bar or start menu after that you can close your pc and restart your pc and then see is it working or not hopefully after in this step it might be going to be work if it is not work in we’re going to show it to the fourth step in this step we’re going to type a code in our powershell so first of all we’re going to open our run command by pressing winky plus r and then we’re going to say it’s going to appear run comma here we’re going to type p o w e r s h e double l and hit enter we’re going to see windows powershell going to be run here i’m going to type it code this code you’re going to find in my video just kim stream just simply copy and paste it over here and after that hit enter after run this code successfully restart your pc and then see this code your windows 11 start menu and search bar going to be work if it is not work let me share it to the five step which is we’re going to try to update our pc so in this case we need to jump over in our windows 11 start menu and then we’re going to click here setting after click our settings click here on this update and then we’re going to click here check for update and see if there is an update available or not if it’s available then download the update and then try to after finishing the update and try to restart a piece and then see easy windows 11 installment and search bar is working or not hopefully in this way it might be a while it does not work in this time we’re going to share it to the step number six in this time we’re going t oedit with our register editor before jump over history editor i’ll suggest you if uh this studio is something very complicated and if you make some mistake it might be damage your windows so before that be sure and you want to do or do some changes before that i will suggest you to take a backup you register editor anyway we’re going to open our registration youtube by pressing on key plus r and it’s going to be appear this run command here you’re going to type here r e g e d i t d i t and hit enter and you’re going to see our registrator going to be up here after open the rest editor it’s going to be looks like this we’re going to extend our hkey local machine and after extend is key local machine we’re going to extend the system folder after extend the 16 fold you’re going t oclick extend the current control said after click over current control said we’re going to click here services after extended services we need to find here wp user services which is uh in to go scroll all the way down uh in this section and then try to find out wp user services you can see this is the wp and user services after choose that in
the right side you can see some code is available here you’re going to find something say start by b default bellow is two we’re going to make it four and we’re going to click here okay and then we’re going to restart our pc after restart your pc hopefully within this step your windows 11 i start menu and search for going to e work if it is not work let me show you the last step which is we’re going to again press one key plus r and in this time we can type here cmd and hit enter after type cmd and hit enter into cs can appear just like this only type here s fc space first let’s scan now swing type is can
now and then hit enter it’s going to take some time for doing this scan after done successfully then restart your pc and after all restart your pc hopefully windows 11 start menu and source bar going to be work so it is all this step i just try to share it with you guys hopefully one of them might be working for you if it is work definitely don’t forget to write something in the comment section which uh it was helpful for you so that’s for now thanks for watching my video see you next one peace
Here’s a concise summary of the steps outlined in the tutorial to fix the Windows 11 Start Menu and Search Bar not working:
- Restart Windows Explorer:
- Press Ctrl + Alt + Delete, select Task Manager.
- Click More Details, locate Windows Explorer, right-click, and select Restart.
- Check if the Start Menu and Search Bar work.
- Restart Windows Search Service:
- Press Ctrl + Alt + Delete, open Task Manager, and go to Services.
- Find WSearch, right-click, and select Open Services.
- Locate Windows Search, double-click, set Startup type to Automatic, click Stop, then Start, and click Apply > OK.
- Restart your PC and test.
- Disable Recommended and Recent Apps:
- Go to Start Menu > Settings > Personalization > Start.
- Turn off Show recently added apps and Show recently opened items in Start, Jump Lists, and File Explorer.
- Check if the issue is resolved.
- Run Search and Indexing Troubleshooter:
- Open Control Panel > Troubleshooting > Search and Indexing.
- Select Can’t start a search or see results, click Next, and let it fix issues.
- Restart your PC and test.
- Run PowerShell Command:
- Press Win + R, type powershell, and press Enter.
- Copy and paste the provided code (from the tutorial’s video description), run it, and restart your PC.
- Check if the Start Menu and Search Bar work.
- Check for Windows Updates:
- Go to Start Menu > Settings > Windows Update.
- Click Check for updates, install any available updates, and restart your PC.
- Test the Start Menu and Search Bar.
- Edit Registry (with caution):
- Press Win + R, type regedit, and press Enter.
- Navigate to HKEY_LOCAL_MACHINE\SYSTEM\CurrentControlSet\Services\WpnUserService.
- Find the Start key, change its value from 2 to 4, and click OK.
- Restart your PC and test. (Backup your registry before making changes.)
- Run System File Checker (SFC):
- Press Win + R, type cmd, and press Enter.
- Type sfc /scannow and press Enter. Wait for the scan to complete.
- Restart your PC and check if the issue is resolved.
The tutorial suggests trying these steps sequentially until the issue is fixed and encourages users to comment on which step worked. Let me know if you need help with any specific step or further clarification!